Welcome, Guest. Please login or register. Did you miss your activation email?

Show Posts

This section allows you to view all posts made by this member. Note that you can only see posts made in areas you currently have access to.


Messages - Recoil

Pages: 1 2 3 [4] 5 6
46
Window / Re: [Question] Creating window, inside other window.
« on: May 27, 2016, 07:28:03 pm »
Not exactly sure how accurate this will apply, but using SFML.NET bindings you can put a picturebox inside a form, and have RenderWindow1 as Form1.Picturebox1.handle.  I was testing out 3 render windows that were pictureboxes in an application recently.

47
Graphics / Re: SFML and Game time
« on: May 27, 2016, 01:49:39 pm »
Thanks guys!

I decided to change getting the time from the Environmental.TickCount to using SFML's clock class.  Using this I am looping through until the time between passes hits an interval amount (16ms - for 60hz; 20ms - for 50hz), so I can have either fps limit or vsync on, or neither and still produce a relative rate to pass through for DeltaTime (16ms).

I'm sending 1/dt through and getting 0.0625ms consistently, which now gives me something to work with to calculate a falling object and implementing gravity.  However, I am not quite understanding the values for the monitor refresh rates (16 or 20), and why they seem to be arbitrary values.

'// 16 for 60hz; 20 for 50hz
interval As Double = 16
 

        _previousTime = _currentTime

        Do
            _currentTime = clk.ElapsedTime.AsMilliseconds()
        Loop While (_currentTime - _previousTime) < interval

        _elapsedTime = _currentTime - _previousTime

        _deltaTime = (1 / _elapsedTime)
 

While I have no idea why the specific interval value, I got the idea for looping through like this from Hapax's Kairos project.  I even tried to make that a dll to use, but I failed horribly because I suck at c++, LOL.  I'm gonna have to crack down and see if there is any way to do a class similar to that so it would be .net compatible (unless it already is and I just am clueless on how to use it) ;)

48
Graphics / Re: SFML and Game time
« on: May 26, 2016, 08:58:28 pm »
Well for one, you don't want both a framerate limit and Vsync.

Two, having a fixed timestep allows for your game to run flexibly, while more-or-less playing the same on different quality hardware. Lower FPS on low-end machines, and higher FPS on high-end machines. But, due to the fixed timestep, the game will still run as desired (potentially except for machines below your minimum required specs).

Okay, would it be advised to turn off the vsync and just have a max FPS set?

49
Graphics / Re: SFML and Game time
« on: May 26, 2016, 07:48:22 pm »
Maybe this will help Fix Your Timestep!.

I have that exact document up in my browser right now LOL

But I was unclear how applicable it would be considering how I can set the max FPS, and the Vsync, both have an effect on the speed of the game.  I did not know if other people use this, or a different method using SFML to correctly adjust TimeStep in their games.

50
Graphics / SFML and Game time
« on: May 26, 2016, 04:09:14 pm »
Sorry if this post is a bit vague, it has been very difficult to wrap my head around everything involved.

For starters:
Language - VB.NET...yes, I already know -_-
SFML - Posting these questions here because the graphics engine plays a key part in my maths.
Farseer - Unable to locate examples that will translate into vb.net
Box2d - I found 1 C# example that I was able to get translated, but am unable to grasp how to set the objects sizes and positions...let's pretend that I don't program as a 9-5, and/or am an idiot.

Okay, with that out of the way I have been transitioning a top down game engine to be able to support 2D side-scrolling.  To test I have been simply trying to get a ball to have visually accurate physics in a testbed application.  It didn't take very long to determine that I would need to incorporate a physics engine for the simple purpose of providing (any) objects realistic physics...and since I have been unable to locate a solid example in vb.net, and trying to get the above engines to work properly is beyond the scope of my understanding, I am simplifying things and building my own engine.

Change in Time, or Delta Time, is one thing that has come up in just about every physics equation that I would have to use to calculate falling/collision/velocity.  The way I am using SFML in my application has a large effect on the time that I need to calculate:

Private Sub InitializeEngine()

        ' Request a 24-bits depth bufer when creating the window.
        Dim contextSettings As New ContextSettings()
        contextSettings.DepthBits = 24

        ' Create main window.
        _testbedWindow = New RenderWindow(New VideoMode(800, 600), "SFML Graphic Controls Testbed Application.", Styles.Default, contextSettings)
        _testbedWindow.SetVerticalSyncEnabled(True)
        _testbedWindow.SetFramerateLimit(60)

    End Sub
 

I understand what SetFramerateLimit does, but when it is turned off it seems pointless since SetVerticalSyncEnabled keeps my FPS around ~60.  However,  just found out that is most likely due to the refresh rate of my monitor, and someone with a 75hertz refresh rate would have a higher FPS without the limit.  Perfect, and I understand it...

Now in my game loop I am calling this every loop:
        ' Reset to keep all timers in sync.
        _currentTick = Environment.TickCount

        ' Counts time every loop, then updates the FPS every second.
        If _currentTick - _timeCount >= 1000 Then
            _fps = _fpsCount
            _fpsCount = 0
            _timeCount = _currentTick
        Else
            _fpsCount += 1
        End If
 

Great...every loop add 1 to the _fpsCount until it reaches 1000 ticks, then update my _fps value that will display on my screen...Check!

In order to achieve realistic physics, I have to get the Change in Time between each game loop.  Since I am already returning the Environment.TickCount every loop, what is the most practical, and most accurate, method to produce the time between the frames?  I could have a Delta_Time variable setup, but I honestly have no clue using SFML the way currently am to return a value to apply to it, that can be applied to the physics equations I have found with my google-foo.

Please not I'm not looking for code, just the logic behind how this is supposed to work properly.  If there is anything that I have overlooked, please let me know.

51
General / Re: Callback implementation question
« on: May 25, 2016, 06:41:12 pm »
Pfft...I had no idea bout "callbacks".  I am still using the events for my render window to check the location of the button, and send the call to the class sub...

Thanks for this post, it gives me something to lookup to fix my pseudo control class ;)

52
General / .NET Physics for SFML?
« on: May 22, 2016, 04:35:41 am »
I have been tinkering around with stuff for my game engine and I am currently working on a small test project with a ball that has various physics aspects applied to it, such as rolling/bouncing/collision/gravity/etc...

Using the best google-foo I could master I set out searching for everything related to making this stuff happen.  Collision with the walls are working, and I can get it to bounce, and roll with rotating the ball shape.  Gravity, not so much.  I wanted to have a jump effect, which kinda works, but it only works on the bottom of the screen.  If I made platforms to jump to it is not going to work.  It seems there is a lot more to a few simple lines of code to make simple things happen.

So I came across the idea of using an existing physics engine...but it also seems I will have to recreate this wheel as well, because there is virtually nothing for vb.net, and everything I could find for C# uses XNA or Mono.  Because I am already comfortable working with SFML I really don't want to switch to anything else.  However, before I even set out on this journey I have to find out if anyone here who uses C# (because I am probably the only one using VB.NET) has a compatible engine they use with SFML?

I came across Box2d already, but the C# port of it was from 2008, and the examples I could never get to even work.  That project is now dead.  The good news is the devs moved on to making Farseer...unfortunately the examples are for XNA and Mono -_-

So I am reaching out to get some ideas.  I don't want to make one from scratch, the maths are just to difficult for me to understand.  Any ideas would be much appreciated.

53
Graphics / Re: Request: Weaponized Text Wrapping Example
« on: May 20, 2016, 04:47:49 am »
I'm a VB.NET programmer, so this is probably not close to what you are looking after.  However, just in case no one comes along and posts fully functional code, maybe this can give you an idea of what you may be able to do...I used an online converter for this BTW.  This has been generically modified as best as I could while trying to remain functional, and with C++ there is probably a much more efficient method of achieving the results you are looking for.

Regardless, here I have a list of strings, the length of the string, and what I want to set to split the words with so it doesn't cut them off at the end:
private List<string> _allTextLines { get; set; }

const int _wordWrapLength = 50;

private readonly char[] _splitChars = new char[] {
        ' ',
        '-',
        ControlChars.Tab
};
 

You entire text string is going to pass here to populate the list with strings of words:
public void AddText(string msg)
{

        _allTextLines = new List<string>();

        foreach (string str in WordWrap(msg, _wordWrapLength)) {
                _allTextLines.Add(str);
        }

}
 

Here is where it is wrapping the lines to be put in sections so the lines aren't split in the middle of a word, then returning it to the method above:
public List<string> WordWrap(string str, int width)
{

        string[] words = Explode(str, _splitChars);
        int curLineLength = 0;
        StringBuilder strBuilder = new StringBuilder();
        int i = 0;
        List<string> rtnString = new List<string>();

        while (i < words.Length) {
                string word = words(i);

                // If adding the new word to the current line would be too long,
                // then put it on a new line (and split it up if it's too long).

                if (curLineLength + word.Length > width) {
                        // Only move down to a new line if we have text on the current line.
                        // Avoids situation where wrapped whitespace causes emptylines in text.
                        if (curLineLength > 0) {
                                strBuilder.Append("|");
                                curLineLength = 0;
                        }

                        // If the current word is too long to fit on a line even on it's own then
                        // split the word up.
                        while (word.Length > width) {
                                strBuilder.Append(word.Substring(0, width - 1) + "-");
                                word = word.Substring(width - 1);
                                strBuilder.Append("|");
                        }

                        // Remove leading whitespace from the word so the new line starts flush to the left.
                        word = word.TrimStart();

                }

                strBuilder.Append(word);
                curLineLength += word.Length;
                i += 1;
        }

        string[] lines = strBuilder.ToString.Split("|");
        foreach (string line in lines) {
                rtnString.Add(line.Replace("|", ""));
                // & vbNewLine)
        }

        return rtnString;

}
 

And here is where it is splitting the words at a space or hyphen, returning it to WordWrap:
public string[] Explode(string str, char[] splitChars)
{
        string[] functionReturnValue = null;

        List<string> parts = new List<string>();
        int startIndex = 0;
        functionReturnValue = null;
        while (true) {
                int index = str.IndexOfAny(splitChars, startIndex);

                if (index == -1) {
                        parts.Add(str.Substring(startIndex));
                        return parts.ToArray();
                }

                string word = str.Substring(startIndex, index - startIndex);
                char nextChar = str.Substring(index, 1)(0);
                // Dashes and the likes should stick to the word occuring before it. Whitespace doesn't have to.
                if (char.IsWhiteSpace(nextChar)) {
                        parts.Add(word);
                        parts.Add(nextChar.ToString());
                } else {
                        parts.Add(word + nextChar);
                }

                startIndex = index + 1;
        }
        return functionReturnValue;

}
 

I'm not going to post what you need to do to draw the text in your list of strings, because the code I have doing that is not yet ready to be presented because of how I am drawing the strings in a pseudo-control multiline textbox.  However, you would do something like this pseudo code:

AddText(a_whole_lot_of_text)

For each textLine As String in _allTextLines
RenderWindow.Draw(textLine)
//offset Y axis here
Next //textLine
 

I'm 99% sure there is a way to get the width of the font so you can set the limit of the _wordWrapLength, but I have been too busy with other things to look into that.  If you happen across it feel free to share.  I hope this helps in some way ;)

54
Graphics / Re: Request: Weaponized Text Wrapping Example
« on: May 20, 2016, 02:38:08 am »
I do not understand you "weaponized" request. But are you asking for an example of text wrapping in a region?  What language are you coding in?

I can post an example if that is what you are looking for, but the best I can do would be to convert it to C# and you try to take it from there.  However, it does not leverage SFML methods for proper text wrapping by the width of the font.

55
Quote
The "endAngle - beginAngle" is the range, specified in degrees so it will work for any corner by changing those values.

To be honest it has been several years since my last math class in college.  But even when I convert radians to degrees, I still have to modify the Sin/Cos +/- for each corner:

currentAngle = ((endAngle - startAngle) * (i / (points - 1))) * PI / 180

Top left
tempX = cx + -Sin(currentAngle) * radius
tempY = cy + -Cos(currentAngle) * radius
 

Top right
tempX = cx + Sin(currentAngle) * radius
tempY = cy + -Cos(currentAngle) * radius
 

Bottom right
tempX = cx + Sin(currentAngle) * radius
tempY = cy + Cos(currentAngle) * radius
 

Bottom left
tempX = cx + -Sin(currentAngle) * radius
tempY = cy + Cos(currentAngle) * radius
 

And
Quote
PI / 2 = (endPoint - startPoint) * (PI / 180)
both provide the exact same results considering I have to modify the Sin/Cos values.  I am missing something, aren't I?

56
2 points...

First, it had not dawned on me to use pseudo code for most of this...I probably could have gotten a lot more help over the years, LOL

Second, you are right.  Initially I knew I had to make the center point(0), but I also thought I had to set the point(1) and point(end), and just fill in between.  Because I am so used to breaking things down (putting all the points in variables instead of on one line) I ended up adding more lines than I probably should have.  However, looking back at my solution, I am really adding only 2 additional points...the rest of all that is just broken down lines into additional variables.

And due to it taking a full day and a lot of brain racking on why everything I tried it would not work (not adding the center points), I almost did not even try what you suggested, but am glad I did ;)

beginAngle = 0
endAngle = 90
radius = 25
cx = (center x)
cy = (center y)

trifan1= VertexArray(PrimitiveType.TrianglesFan)
trifan1.Append((cx, cy), col2))

For i = 0 To points - 1

currentAngle = ((endAngle - beginAngle) * (i / (points - 1)))
trifan1.Append((cx + Sin(currentAngle) * radius, cy + -Cos(currentAngle) * radius), col1))

Next

MyWindow.Draw(trifan1)
 

It looks like a lot of code there, but it's actually not, and really only 2 lines shorter from my original code (without everything being broken down).  I can even simplify this even more by just putting everything in the for loop on 1 line.  But every bit of efficiency I can learn to implement is appreciated ;)

Edit: after implementing this for the whole test sub, it will only work with 8 points right out of the box.  Adding more or less make the corners into stars and various shaped hexagons and octagons, LOL.  I'll have to tinker with it.

Edit#2:  This solved it for any number of points: currentAngle = ((PI / 2) * (i / (points - 1)))

Edit#2.83: However, I also remember why I wanted to set the additional 2 points...this is a test shape for a button.  I was originally testing to make not only the gradient, but the rounded corners as well.  Setting the other 2 points on the corner allowed this to have a 45 degree angle with no points set.

I'm still pondering over all the details for my final control, and what properties I have to setup so it can be fully customizable.  Setting a larger radius currently requires changing the thickness of the outside 4 rectangles, which also sets the size of the radial gradient effect.  Honestly this has not been the easiest to figure out how to make everything work, and look right as well.


57
It literally took me all day, and a post in a math forum, to be able to get some help to come up with a solution.  This example is for the top right corner.  The [radius] is 25 pixels, and it sets the height of the top and bottom rectangles, and the width of the left and right ones...this also sets the size of the corner.

FYI, no I could not think of another way to make this happen...

'cx and cy are the center coordinates of the triangle fan.
        cx = loc.X + (size.Width - (radius))
        cy = loc.Y + radius

        'x1 and y1 are the coordinates for 270 deg point
        x1 = loc.X + (size.Width - (radius))
        y1 = loc.Y

        'x2 and y2 are the coordinates for 0 deg point
        x2 = loc.X + (size.Width)
        y2 = loc.Y + radius

        Dim trifan1 As New VertexArray(PrimitiveType.TrianglesFan)
        trifan1.Append(New Vertex(New Vector2f(cx, cy), col2))
        trifan1.Append(New Vertex(New Vector2f(x1, y1), col1))

        For i = 0 To points - 1

            Dim x As Double
            Dim y As Double
            Dim t As Double = (PI / 2) * (i / points - 1)

            x = cx + Cos(t) * (radius)
            y = cy + Sin(t) * (radius)

            trifan1.Append(New Vertex(New Vector2f(x, y), col1))

        Next
       
        trifan1.Append(New Vertex(New Vector2f(x2, y2), col1))
        DmWindow.Draw(trifan1)
 

This is the modification for the bottom left corner.  For each corner you have to offset the Cos/Sin by their inverses, depending on which corner you are working on.
            x = cx + -Cos(t) * (radius)
            y = cy + -Sin(t) * (radius)
 

58
No, you were correct, I did want a radial gradient.  But after your post it helped me achieve the appearance of a radial gradient on the button, in the most long and drawn out way I could possibly fathom. :D

I know you can't help me with specific code issue, I understand.  Maybe someone else can come along and tell me what I am supposed to do in my For/Next loop for my x/y values to increment them accordingly?  This is just wrong, and I know it.  But I'm unable to determine how to increment it properly.
Dim points As Integer = 5

' Size (thickness) of the corner piece is 25:
Dim radius As Double = thickness
Dim angle As Double = 90.0

Dim xOffset As Double
Dim yOffset As Double
Dim angleRadians As Double

' Convert degrees to radians
angleRadians = 2 * PI * angle / 360 '/ 180 '

' Calculate the X and Y offset to step
xOffset = Cos(angleRadians) * radius
yOffset = Sin(angleRadians) * radius


Dim tf As New VertexArray(PrimitiveType.TrianglesFan)

' Point0 - the inside corner
tf.Append(New Vertex(New Vector2f(cx, cy), col2))

' Point1 - the top 0deg
tf.Append(New Vertex(New Vector2f(x1, y1), col1))

For i = 1 To points

        tf.Append(New Vertex(New Vector2f(x1 + xOffset, y1 + yOffset), col1))

Next

' Point7 - 90degrees right
tf.Append(New Vertex(New Vector2f(x2, y2), col1))
MyWindow.Draw(tf)


Now I have found several examples to draw an arc between 2 points knowing the radius, but none of them work when trying to simply insert a point for the TriangleFan.  I know I'm so close...but probably off several dozen miles.

59
Thanks Hapax.  I have tried working with shaders before, but ran into too many issues.  The only benefit of going the second route is that the code only has to be written once and ported to my class.  So I chose a midpoint between the second and third options you provided, and decided to draw 5 connected rectangle shapes that define the size of the gradient by the "thickness" value.

Warning: broken down redneck code:
(click to show/hide)

Here are those results:


Trying to get an idea of how to do the rounded corners, I came across this:


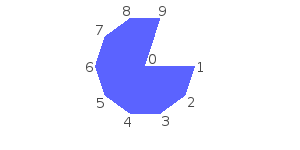
What I would like to do is be able to pass a variable for the number of points, say 3, for how many triangles that would make up the fan, and generate the fan that way, instead of trying to micro calculate each point.  The math involved is obviously above my head because it has been several year since I messed with this stuff.

But for each corner I can define the following:
'This triangle fan is going to be 90 degrees, with 4 triangles, 3 points, in between x1/y1 & x2/y2...

'number of triangles
Dim points as Integer = 3

'cx and cy are the center coordinates of the triangle fan.
Dim cx As Integer = loc.X + thickness                            ' 100 + 25
Dim cy As Integer = loc.Y + thickness                            ' 100 + 25

'x1 and y1 are the coordinates for 270 deg point
Dim x1 As Integer = loc.X                                        ' 100
Dim y1 As Integer = loc.Y + thickness                            ' 100 + 25

'x2 and y2 are the coordinates for 0 deg point
Dim x2 As Integer = loc.X + thickness                            ' 100 + 25
Dim y2 As Integer = loc.Y                                        ' 100
 

What would be a formula for generating the points in between with their angles for that fan?

60
I guess I was posting about this in the wrong forum.  Here is what I was running into with the gradient issue:
http://en.sfml-dev.org/forums/index.php?topic=20324.0

So that is fixed though, and I was able to piece together how to do either a vertical or horizontal gradient for my button control.  TBH, I have been so unsuccessful getting any of the control libraries that are out there working with VB.NET, because there are virtually no tutorials.  Most of the tutorials and documentation I have found has been in C++, and very limited info in C#.

Anyways, I'm making some progress on a custom control library.  There are a few bugs I am still working out, and some functionality missing, but so far I am okay with what I have been able to come up with on my own:


I would like to extend this though, mainly the graphics for the buttons.  Still working out how to do it, but it can (originally did) show images for the buttons.  So, with the above issue solved for the gradient, I can make the gradient vertical or horizontal.  I would like to see about extending this to a radial gradient, and hopefully having a rounded rectangle.  I ran across this looking for an idea for a rounded rectangle shape:
https://github.com/SFML/SFML/wiki/Source%3A-Draw-Rounded-Rectangle

With my limited skills, I made a failed attempt to convert that to VB.NET, and I get a flag with really weird half circles on the sides of the flag.  I think it best I try to make something on my own instead, that way I may be more able to understand how it actually works.

I would like some help understanding how a rounded rectangle shape should be made?  I was able to find a limited number of docs online in C++ that suggests using triangle fans...but those are way over my head, and I was lucky to figure out how to make a rectangle on my own.

Second, instead of using either a vertical or horizontal gradient, I would like to be able to use a radial gradient.  The same documentation I found on this also dealt with using triangle fans...which doesn't help when it is C++.

I'm not necessarily looking for code, but it would be appreciated.  But if someone can provide me a few ideas how to achieve a radial gradient effect as well as a rounded rectangle effect for a custom button control I would really appreciate it.

Note: I am also after some general ideas for being able to skin these controls, like selecting a color scheme and it apply to every customizable aspect of that control, which would make things easier instead of setting every color for every object on the control.  Another thing I am looking for ideas on is the best approach to allowing the use of gradients, as well as custom images.  The only thing here I can think of is on the drawing sub for the control (If ImgTexture = Nothing Then DrawGradient, Else Draw ImageTexture)...but there has got to be a more logical approach that I have overlooked.

I really appreciate any help or ideas you guys can give me...Thanks!

Pages: 1 2 3 [4] 5 6
anything